EXPERT GUIDE TO BUYING RADIATOR VALVES
HOW TO CHOOSE YOUR VALVES
Your brand new designer radiator was created by passionate and inventive minds who sought to achieve great things by heating your home and warming your heart with a gorgeous radiator. It’s important then to accompany your brand new designer radiator with a set of valves which not only fits perfectly to it, but also complements its finish and design.
Read this handy valve guide to help you find the perfect match for your radiator.
First of all, what is the valve set for? Valves are used to control the flow of water into and out of your radiator, and to control the temperature of the room. Without them you would have no control over your radiator! There are two main types of valves, and they are Thermostatic Radiator Valves (referred to as TRVs) and Manual Valves.
WHICH VALVES DO I NEED?
There are three decisions to make when buying your valves, these are;
Step 1 – Which valve shape you need – Angled, Corner or Straight
Step 2 – Whether you want them to be Thermostatic or Manual
Step 3 – Which design takes your fancy
STEP 1 – VALVE SHAPE
There is a simple method to understand which shape of valve that you need, but first you need to know where your pipework is currently, and where on the radiator the valves need to connect.
For the pipework the main two arrangements in most households are pipes which come upwards from the floor, or pipes which come outward from the wall.
For the radiator it will typically have connections at the lower portion of its design, either directly underneath the radiator, or on the side. If you can’t tell please feel free to ask us!
Once you know where your pipework comes from, and where the radiator needs to be connected to then follow our simple guide just below;
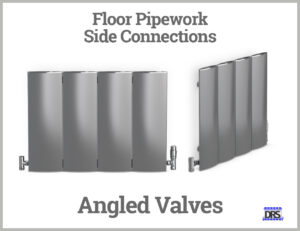
FLOOR + SIDE
Pipework coming up from the floor + radiator connections on the side = Angled Valves
This combination would work for any pipework which comes up from beneath. In some houses you may have pipework which runs along the skirting and can’t be concealed under the floor or in the wall, in these cases you would want to bring the pipework to the correct positions underneath the valve before bringing them upwards to meet the bottom of the valves.
Similarly with flexi-pipes it is common to bring them to the bottom of an angled valve and have them take a turn upwards into the valve.
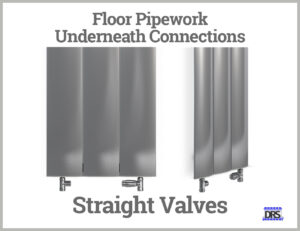
FLOOR + UNDERNEATH
Pipework coming up from the floor + radiator connections on the underneath side = Straight Valves
In this example we can see that Straight valves suit underneath connections perfectly. The heads of each part of the valve are positioned neatly underneath the radiator for the cleanest appearance. Normally it would be a towel rail with connections in this position, but as you can see the vertical version of the Bisque Lissett has connections on the underneath side.
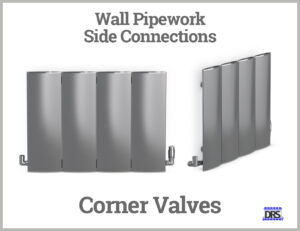
WALL + SIDE
Pipework coming out from the wall + radiator connections on the side = Corner Valves (recommended) or Angled Valves
With pipework coming out from the wall a corner valve is the modern way to keep your valves out of the way. For the cleanest appearance the pipework wants to be the exact distance apart that the valve will be.
This measurement is referred to as the pipe centre and is very useful when a radiator won’t be on site for a while, but you need to put the pipes in place to plaster/wallpaper/tile around them. Once the radiator is ready the plumber simple needs to return to hang it and connect the valves to the pipework and the radiator.
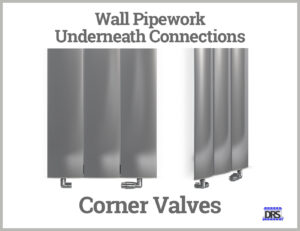
WALL + UNDERNEATH
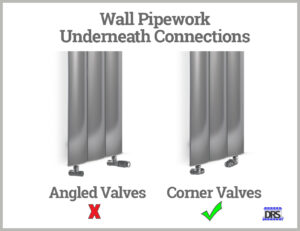
Pipework coming out from the wall + radiator connections on the underneath side = Corner Valves (recommended) or Angled Valves
These three basic valves shapes can seem a bit tricky but really aren’t that much trouble, especially once you can visualise it. Above we can see that when the pipework comes out from the wall and your radiator has connections underneath, the best possible valve set is a Corner variation.
WALL PIPEWORK – ANGLED VS CORNER VALVES, WHICH IS BETTER?
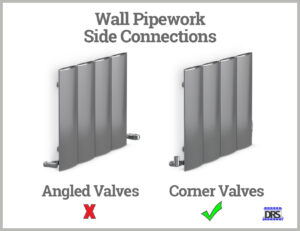
For cases with pipework coming from the wall you can actually use either Corner or Angled valves without a problem. The reason we at DRS recommend Corner valves in this circumstance is so that the head of the valve tucks underneath the radiator neatly, whereas an Angled valve would protrude into the room, poking out further than the radiator itself!
Here’s our handy example showing this on a radiator with pipework coming out from the wall;
As you can see, Angled valves can be fitted to the radiator in this example, but they protrude forwards away from the wall, so much so that they stick out past the radiator. In a large room this might not be a problem, but they do pose a risk of being walked into (hurting your shin and potentially damaging the valve). When space is at a premium they could be taking up valuable space, and quite importantly they do look at lot like a nice foot-hold for any adventurous little ones who might fancy climbing your new designer radiator – A catastrophe worth avoiding!
Similarly, here is a comparison between Angled and Corner valves with connection for the valves underneath the radiator – This is less common with designer radiators, but very normal with towel radiators;
Little trip hazards like this are what we are DRS are here to help you avoid. We often have customers tell us that their plumber has recommended Angled valves, and technically they’re not wrong, but the realm of amazing looking radiators is our domain and we hate to see a beautiful radiator tainted by either ugly valves that have no right to go with that radiator, or the wrong shape of valve.
STEP 2 – VALVE TYPE
THERMOSTATIC RADIATOR VALVES (TRV)
For most designer radiators in the home a TRV is the best choice because they allow you to control the individual temperature of specific rooms so that you don’t need to rely upon turning the main thermostat up and down.
The science behind them is actually incredibly simple, but the result is absolutely amazing. Inside the body of the TRV there is a valve connected to pin above it which points upwards. When you fit the head of the TRV onto the body there is a plunger which sits directly above the pin. Directly above the plunger is an expanding piece which reacts to the temperature.
When the TRV is adjusted to a setting such as the number 3 (out of 5), the plunger does not touch the pin, but as hot water fills the radiator, and the room gets hotter, the expanding piece begins to swell, pushing the plunger downwards onto the pin, which in turn closes the valve, meaning that the radiator and the room begins to cool.
Once the room and the expanding piece have cooled by a couple of degrees, the swelling is reversed and the valve opens again. The TRV regulates the room’s temperature by repeatedly going through this process.
When you adjust the TRV setting to 5 or MAX, the valve is effectively screwing off and moving further away from the pin until the expansion of the swelling piece can no longer reach the pin, meaning that the radiator stays at full temperature. Likewise when you lower the TRV setting, the valve is screwing on, and thus getting close to the pin, meaning that the valve cuts off with less swelling required and thus a lower temperature.
MANUAL VALVES (TRV)
For most towel radiators a Manual Valve would be the go-to choice simply because you often don’t need to think about turning your bathroom’s radiators up or down, and additionally Manual Valves are smaller and feature more design choices.
Manual Valves are operated purely by your choice to open them and close them yourself. There is nothing complex about their design; they simply remain open or closed depending on your choice. Most Manual Valve sets include a Lock-Shield valve which is adjusted by your plumber at the time of installation, and a Wheel-Head valve which is for you to use. Occasionally valve sets can include two Wheel-Heads.
Because manual valves are smaller than TRVs, they are usually the choice to go for in bathrooms, or with radiators where you don’t think you will need to adjust the radiator at all, and want to have the most discreet options available.
STEP 3 – DESIGN
This is the fun part! Head over to our Designer Radiator Valve category and see what works for you! Whether it is the modern Realm TRV set for a sleek new radiator, a Cubex set for a square shaped towel rail or even the Faringdon TRV set for a rustic cast iron radiator, we have something for every need.
MINA
For some designer radiators you might not want the extra control of a TRV, so you might choose to go for a neat manual option. Well that’s where the Mina range comes in with its smaller size and soft, rounded shape.

Our Mina range is both sleek and discreet. A small valve means that they aren’t distracting your attention away from the radiator and serve the purpose very quietly. The Mina sets are especially ideal for towel rails due to their small size, paired with the fact that will often just leave a towel radiator set to its maximum setting.
REALM
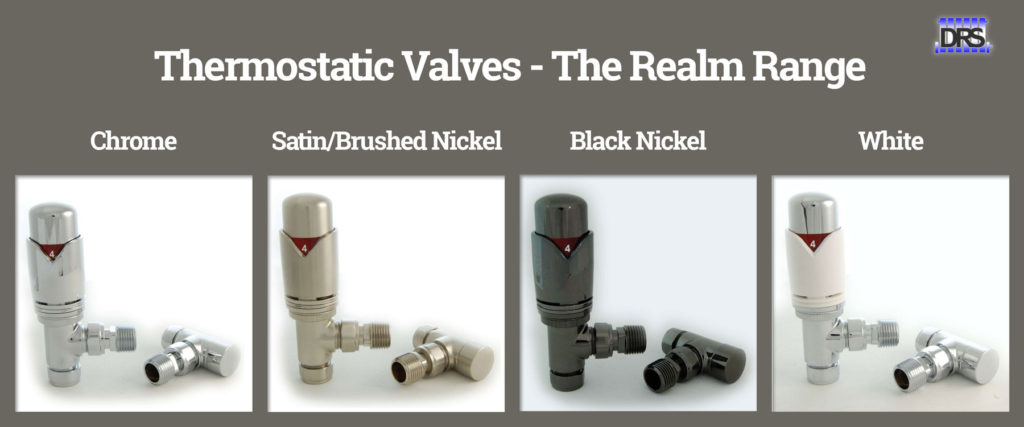
The next step up from the Mina set is our Realm TRV range. A striking thermostatic radiator valve which allows you to have the direct control you need over each radiator and so each room in your home. While most TRVs on the market look clunky, have oversized heads which don’t ever seem to fit in, our Realm TRV range is slender, made from high quality brass (like all of our accessories), and works with any radiator, modern or traditional.
CUBEX
Some radiators simply scream for a square set of valves, particularly cubic designer radiators in Chrome or Stainless Steel. When the aesthetics are more important than being able to control each radiator individually, then completing a straight-edged radiator with our fantastic Cubex valve sets works wonderfully.
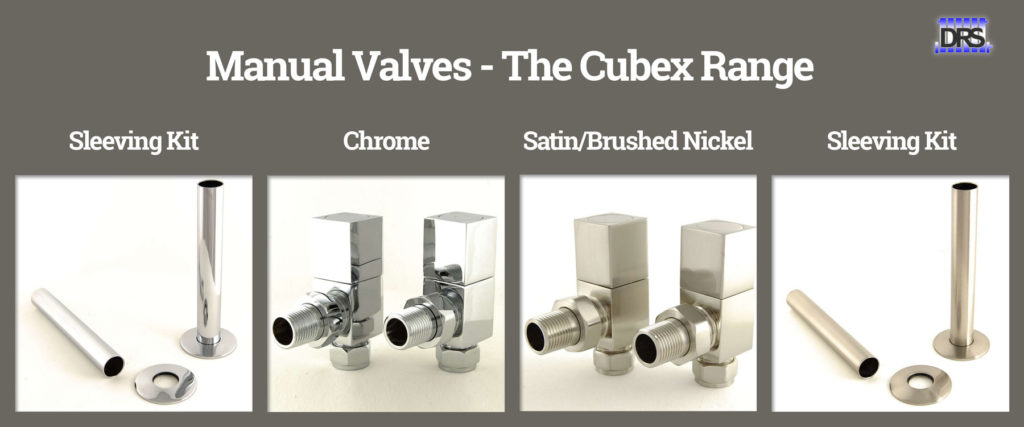
The Cubex range is available in Chrome and Satin Nickel finishes, and like all of our valves can be paired with matching Sleeving Kits in the exact same finish option. The smooth visual effect of the Cubex valve is created by using smaller nuts than you will find on other square valves on the market, creating a discreet appearance which centres on the cubic style.
FARINGDON TRV SET
Traditional radiators are exceptionally beautiful even amongst other designer radiators, and boast exquisite detail and shape, so it is important that you choose the best valves to accompany them.
The Faringdon TRV set is just such a valve. The Faringdon features a thermostatic head with a classic, genuine wooden wheel for controlling the setting of the valve.
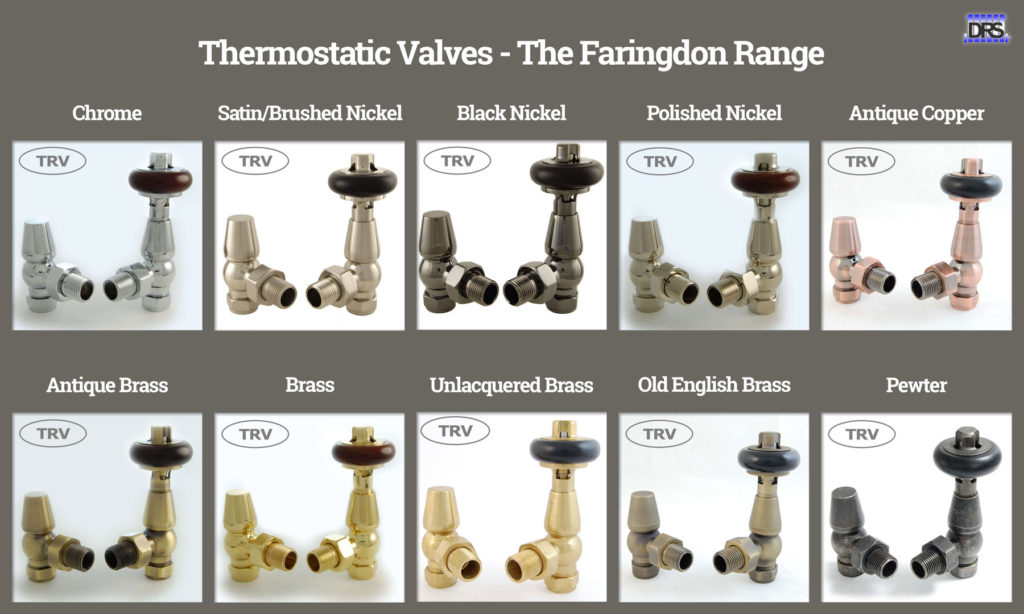
The Faringdon sets are available in 10 completely individual finishes, each of which is just as flexible as the hundreds of finishes available for our traditional radiators. These simply stunning valves are what we recommend for any classic radiator style as they complement the Victorian, Edwardian and Tudor inspiration that cast iron radiators and steel multicolumn draw from.
SLEEVING KITS
Finally, no valve set, whether they accompany a modern or traditional radiator, can be complete without a sleeving kit to match them.
Designer radiators are works of art which deserve equally stunning valves and accessories. Leaving the copper pipe to be seen by all defeats the whole object of choosing a high-end, luxury good like a designer radiator.
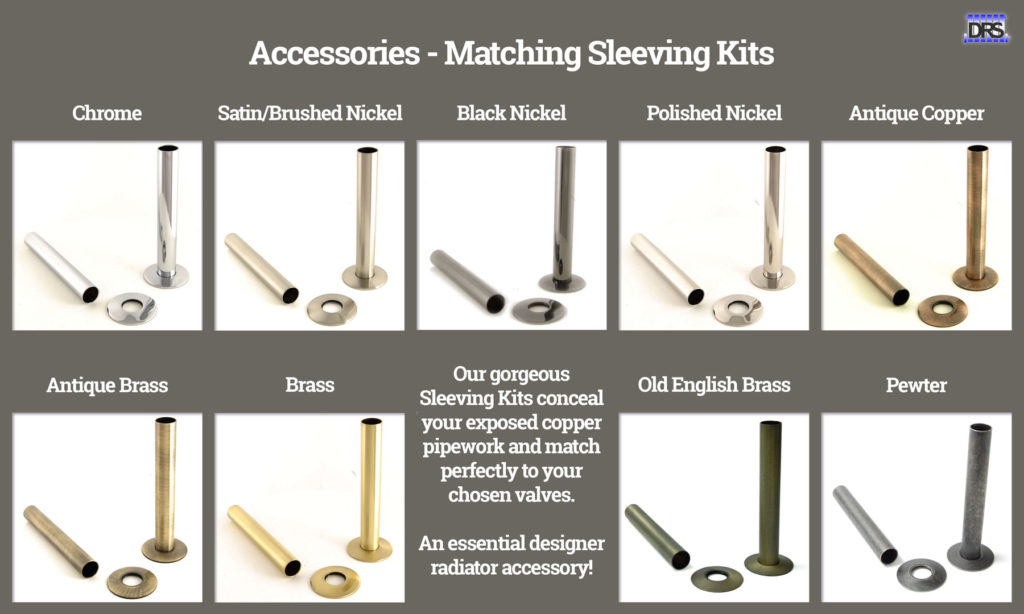
Because our Sleeving Kits are manufactured in the same factory as our accessories, each kit can pair together wonderfully with any set of our valves to create an absolutely stunning appearance which otherwise cannot be created.
Not only do our Sleeving Kits conceal the copper pipework, they also feature circular rosettes to push right up again your flooring or your wall in order to hide the cut into the wall which can often look unsightly. It’s safe to say that no valves should be without a matching Sleeving Kit.
MATCH MADE IN HEAVEN
If you are going to buy a special designer valve, make sure to match all of your accessories with the same finish! The finished appearance is spectacular.
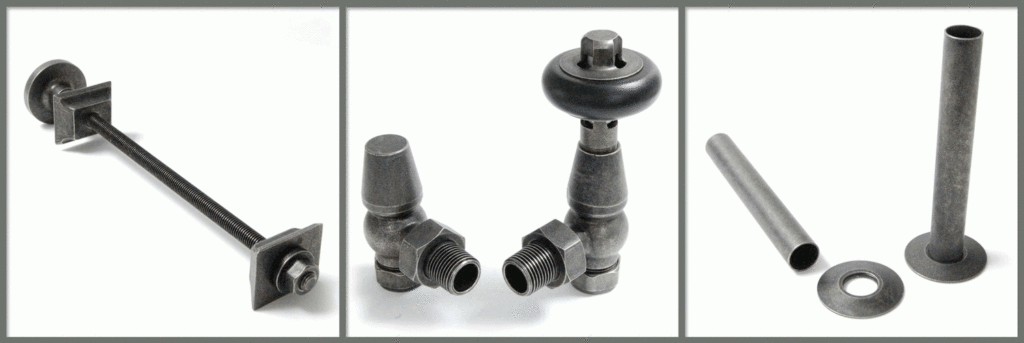
With a gorgeous set of accessories matching together like our Pewter ones do, you can turn your feature radiator into a showstopping beauty your can hardly keep your eyes off. Let’s be honest, there are few things in life like the subtle sense of satisfaction when you know your guests can’t keep their eyes off your latest design choice!
Click HERE and start looking for the perfect valves for you, right now!
REMEMBER!
While you can get away with letting your plumber pick up a set of valve for you, you’ll often be paying above the odds for them, and they are very likely going to be the run of the mill valves you might put with a boring old radiator.
Trust us when we say that there’s no better way to kill the gorgeous appearance of your designer radiators than to have people’s attention drawn straight to the boring valves which don’t suit your luxury purchase.
We at DRS hope this handy Valve Guide has helped you find exactly what you need, but if you would like any further assistance simply let us know by calling 01257 452879, or dropping us an email through to sales@designerradiatorshowroom.co.uk


